
I have written a lot about the use case of static websites and leveraging AWS to host, secure, and deliver them. It is after all the context within my Learn AWS By Using It course that we use in order to accelerate our learning of Amazon Web Services.
In addition to my course, I have also put together quite a few blog posts that focus on static websites.
- How to Host a Website on S3 Without Getting Lost in the Sea
- How to use CloudFront for Secure Delivery of Static Websites Around the World
- Adding Free SSL Certificates To Static Websites via AWS Certificate Manager
- How to continuously deploy a static website in style using GitHub and AWS
These posts have been fantastic for folks just getting started on their journey to learning AWS. Why? Because they provide a context that enables us to learn various services while actually using them.
Today, I want to go into a bit more detail on a particular collection of services that can allow us to optimize the delivery of our static websites.
In particular, we are going to focus on how we can leverage AWS CloudFront, our Content Delivery Network (CDN), and AWS S3 to optimize the delivery of our static website on AWS.
This post assumes that you have met the following pre-requisites. If you are missing one of these, feel free to read the other posts above.
- You have a static website hosted out of AWS S3.
- That static website is being served via AWS CloudFront.
- There is a CI/CD Pipeline configured in your AWS Account in order to continuously deploy your website.
Are you ready to get started? Let’s dive in!
What does caching look like for our use case?
Before we dive into our optimization we first need to have a quick primer on caching.
In short, caching is a mechanism by which something can be stored away for future use. Often times that storage is faster or closer to the user than another form of storage. For instance, we might cache the results of a database query locally in memory so that we don’t need to read them from the database again.
Let’s think about our static website infrastructure for a moment.
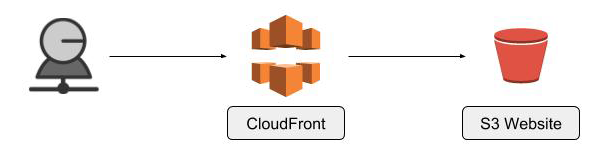
We see that we have our CloudFront distribution sitting in front of our S3 website bucket. When a request comes into our distribution it is forwarded onto our S3 website. If we think about this in terms of caching, our distribution is closer to the end user than our S3 bucket.
If we can store content at CloudFront and eliminate the need to go to our bucket for every request we can speed up the delivery of our resources to the user.
Luckily for us, CloudFront supports this out of the box.
At the time of this writing, CloudFront has 124 edge locations and 11 edge caches across the globe. A request flowing into our distribution has the following steps.
- The request is relayed to the edge location closest to the user.
- The location checks a cache location for the requested content. If the cache has the content and it’s not expired, the cached content is returned to the user. Otherwise, the request is passed to the origin where the content is requested from the origin.
Frankly, caching can be hard. This is because we run the risk of inadvertently serving stale data to our users because they are being served a cached response. But as we are going to see, by combining CloudFront with our CI/CD Pipeline in AWS, we can implement basic caching at our distribution in just a few minutes.
Tweaking CloudFront to cache our static website
When we initially configured our distribution we left our Default Behavior at the default caching rules.
We set the Minimum TTL to 0, the Maximum TTL to 31536000 (one year) and the Default TTL to 86400 (one day).
With our current configuration, all of our static website resources are cached in CloudFront for one day. This is because we are not adding any cache headers to the objects in our S3 bucket and our minimum time to live (TTL) is set to 0. Therefore our distribution relies on the default TTL of one day.
Currently, anytime we deploy our static website to S3 we must issue an invalidation to CloudFront that tells it to dump its cached results in order to forward new requests to our S3 bucket.
There are two things we can optimize here. First, let’s change the Default TTL of our distribution from one day to one month.
We can do this via the AWS Console by editing our Default Behavior.
- Go to CloudFront in the AWS Console.
- Click the ID of your distribution.
- Select the “Behaviors” tab.
- Check the “Default” behavior.
- Click “Edit”.
- Change the “Default TTL” from 0 to 2628003.
- Click “Yes, Edit”.
Once this change propagates across our distribution, which can take ~5–10 minutes, all of our resources will default to being cached in CloudFront for one month.
We can observe this inside of our Chrome DevTools. The first request for an image has a response like this.
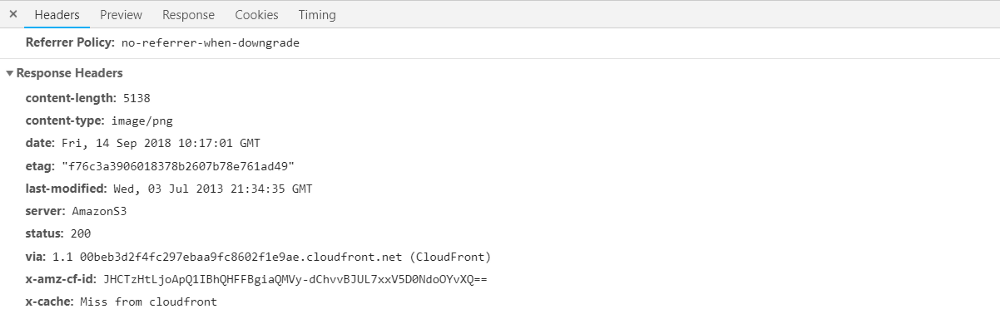
Notice the x-cache header at the bottom. It says this request resulted in a miss from CloudFront. This means that our
request was forwarded to our S3 bucket because the response was not in an edge cache.
If we refresh the page, a new request is sent to our distribution and this time we see a “Hit from CloudFront” in our
x-cache header.
This is because the response for that image is now present in our edge cache and will remain so for one month or until we invalidate the cache.
Now let’s explore how we can use our CI/CD Pipeline in AWS to invalidate our cache anytime we deploy our website.
Using our CI/CD Pipeline in AWS CodePipeline to invalidate our cache
So we have taken measures to cache response in CloudFront for a month instead of a day. But, now we have a stale cache problem.
What if we are constantly developing our website and deploying new content to S3 daily or even hourly? With every
deploy, we must run our create-invalidation command from our command line.

That sounds tedious and painful.
Luckily, we can leverage the CI/CD Pipeline we created using AWS CodePipeline and CodeBuild to automate this for us.
If you recall we have a special file, buildspec.yml, that defines the steps our AWS CodeBuild project takes in order
to build, test, and deploy our static website. This is what that file looks like right now.
version: 0.2
phases:
  install:
    commands:
      - echo "install step"
  pre_build:
    commands:
      - echo "pre_build step"
  build:
    commands:
      - aws s3 sync --delete . "s3://<your-static-website-bucket>"
  post_build:
    commands:
      - echo "post_build step"
But, we can add an additional step to the post_build section. Take a look at our new file below.
version: 0.2
phases:
  install:
    commands:
      - echo "install step"
  pre_build:
    commands:
      - echo "pre_build step"
  build:
    commands:
      - aws s3 sync --delete . "s3://<your-static-website-bucket>"
  post_build:
    commands:
      - aws cloudfront create-invalidation --distribution-id <your-distribution-id> --paths '/*'
Here we have added our AWS CLI call to invalidate our CloudFront distribution inside of the post_build step. If you
replace <your-distribution-id> with the ID of your CloudFront distribution you will automatically invalidate the
caches with each deploy.
Simple right? We have combined everything we have learned and have begun optimizing the manual tasks away. Now we can rapidly develop our static website, continuously deploy it, and still optimize the delivery to our users via effective caching at CloudFront.
A few things to note…
This is a fantastic enhancement to our static website use case. We have learned how to leverage our existing services to optimize the delivery of resources to our users.
However, it is worth noting a few things that are worth looking into depending on your use case.
- Our Default TTL is set to one month for all of our resources. With our new automated cache invalidation, we could extend this to be even longer. Maybe once the development of your site is complete, one year makes sense?
- It is possible to have different periods of caching for different resources. Here we are using our only behavior, the Default Behavior. But you could add a behavior for all .png images and have a different caching strategy for that type of resource.
- We are not appending any cache headers to our resources stored in S3. Therefore browsers won’t try to cache any resources locally.
The last point is entirely possible by tweaking our buildspec.yml file once more.
version: 0.2
phases:
  install:
    commands:
      - echo "install step"
  pre_build:
    commands:
      - echo "pre_build step"
  build:
    commands:
      - aws s3 cp . "s3://<your-static-website-bucket>" --recursive --cache-control 'public, max-age=2628000'
  post_build:
    commands:
      - aws cloudfront create-invalidation --distribution-id <your-distribution-id> --paths '/*'
Notice that our build step has changed. Here we are calling the copy command to copy the contents of our current
directory up to our S3 website bucket. We append a new flag to our call, --cache-control, and give it the value
public, max-age=2628000.
When our resources are copied to our S3 bucket the CLI will add a Cache-Control header to every resource with the value we specified. This allows us to leverage caching locally in the browser and in our CloudFront distribution.
Conclusion
In this post, we have explored how to take our existing knowledge of hosting, securing, and delivering static websites on AWS to begin further optimizing things.
We demonstrated how we can tweak our CloudFront distribution to have a longer default period of caching. To prevent problems for our users we added cache invalidation to our build process via our CI/CD Pipeline using AWS CodeBuild and CodePipeline. We then saw how we can tweak how our resources are copied to S3 in order to append cache headers that the browser can recognize.
Amazon Web Services is a very powerful platform with many different services for various use cases. It is best to begin learning those services by applying them to a problem you are facing. Once you have learned the basics of a service you can begin to digger deeper like we have done here to squeeze even more out of it.